채팅 프로필
채팅 프로필 설정 페이지에서는 웹사이트의 MChat 프로필 위젯을 사용자 정의하고 관리할 수 있습니다.
이는 다음과 같은 주요 구성 요소로 구성됩니다.
-
프로필 미리보기: 이 섹션에는 채팅 프로필 위젯이 웹사이트에 어떻게 표시되는지 실시간 미리보기가 표시됩니다. 설정을 변경하면 실시간으로 업데이트됩니다.
-
프로필 설정: 이 섹션에는 채팅 프로필 위젯을 사용자 정의할 수 있는 다양한 옵션이 포함되어 있습니다.
-
근무 시간: 이 섹션에서는 채팅 위젯의 근무 시간을 정의할 수 있습니다.
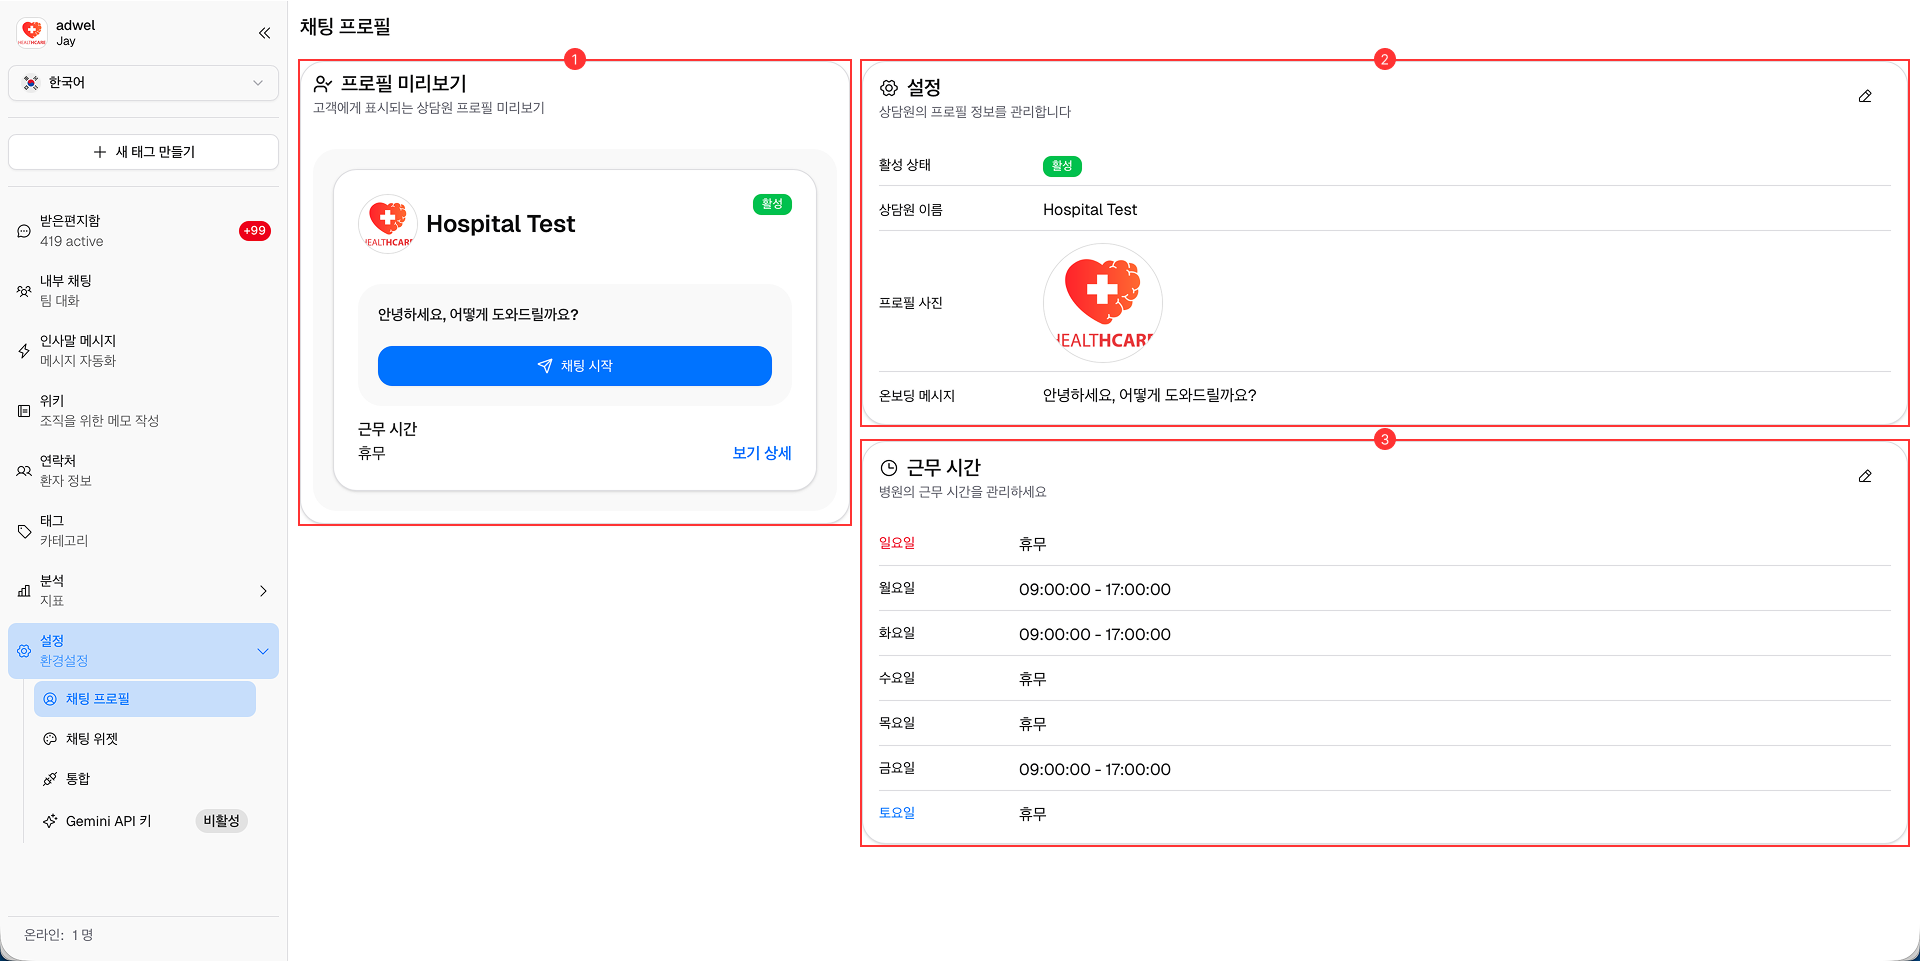
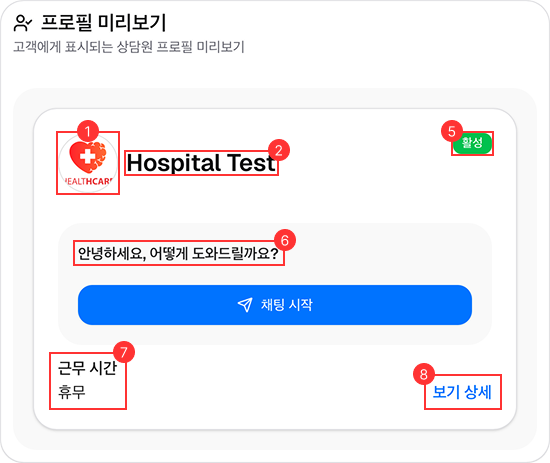
프로필 미리보기
프로필 미리보기 섹션에서는 채팅 프로필 위젯이 웹사이트에 어떻게 표시되는지 실시간 보기를 제공합니다. 이는 프로필 설정 및 근무 시간 섹션의 변경 사항을 반영합니다.
이는 다음 요소로 구성됩니다.
-
프로필 사진: 프로필 설정에 설정된 상담원 또는 지원팀의 프로필 사진을 표시합니다. (본 병원 프로필 사진과 별개입니다)
-
에이전트 이름: 프로필 설정에 지정된 상담원 또는 지원팀의 이름을 표시합니다.
-
제목: 프로필 설정에 설정된 "지원", "고객센터" 등 채팅 위젯의 제목이 표시됩니다.(더 이상 사용되지 않음) -
부서: 해당되는 경우 프로필 설정에 지정된 대로 채팅 위젯과 연결된 부서를 표시합니다.(더 이상 사용되지 않음) -
상태 표시기: 프로필 설정의 활성 상태 설정에 따라 채팅 위젯이 활성 상태인지 비활성 상태인지를 나타냅니다. (설정에만 표시됨 - 라이브 위젯에서는 숨김)
-
온보드 메시지: 프로필 설정에서 사용자 정의한 대로 사용자가 채팅 위젯을 열 때 보게 될 환영 메시지를 표시합니다.
-
오늘의 근무 시간: 근무 시간 섹션에 정의된 설정을 기준으로 오늘의 근무 시간을 표시합니다. 해당일에 채팅 위젯이 닫혀 있으면 "닫힘"으로 표시됩니다.
-
상세정보 보기: 클릭 시 전체 근무시간 일정을 보여주는 버튼입니다.
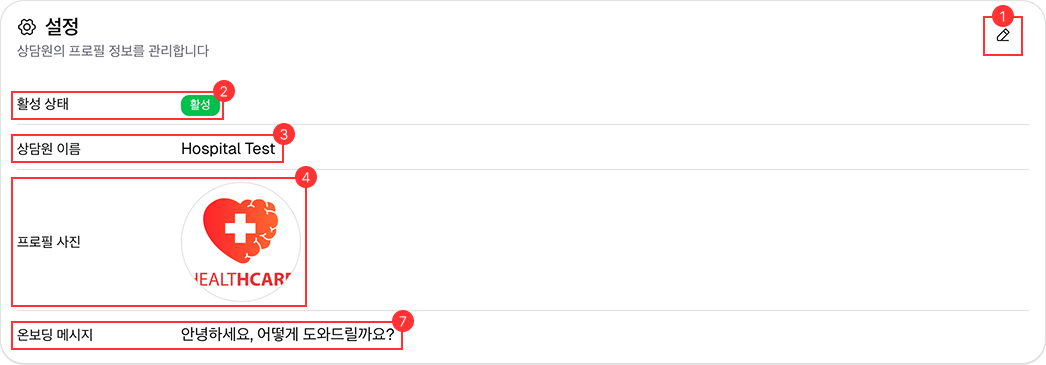
프로필 설정
채팅 프로필 위젯을 사용자 정의하려면 *Settings 섹션에서 정보를 조정할 수 있습니다.
이는 다음으로 구성됩니다:
-
편집 버튼: 프로필 설정 필드를 편집하려면 이 버튼을 클릭하세요.
-
활성 상태: 웹사이트의 채팅 위젯 표시 또는 숨기기를 전환합니다.
-
에이전트 이름: 채팅 위젯에 표시될 상담원 또는 지원팀의 이름을 지정합니다.
-
프로필 사진: 채팅 위젯의 프로필 사진을 업로드하거나 선택합니다. (본 병원 프로필 사진과 별개입니다)
-
제목: "지원", "고객센터" 등 채팅 위젯의 제목을 설정합니다.(더 이상 사용하지 않음) -
부서: 해당되는 경우 채팅 위젯이 연결될 부서를 선택합니다.(더 이상 사용되지 않음) -
온보드 메시지: 사용자가 채팅 위젯을 열 때 표시되는 환영 메시지를 사용자 정의합니다.
근무 시간 설정
채팅 위젯의 근무 시간을 정의하려면 근무 시간 섹션을 사용하세요. 환자가 언제 지원이 가능한지 알거나 인사말 메시지 의 조건으로 사용하는 것이 유용합니다.
이는 다음으로 구성됩니다:
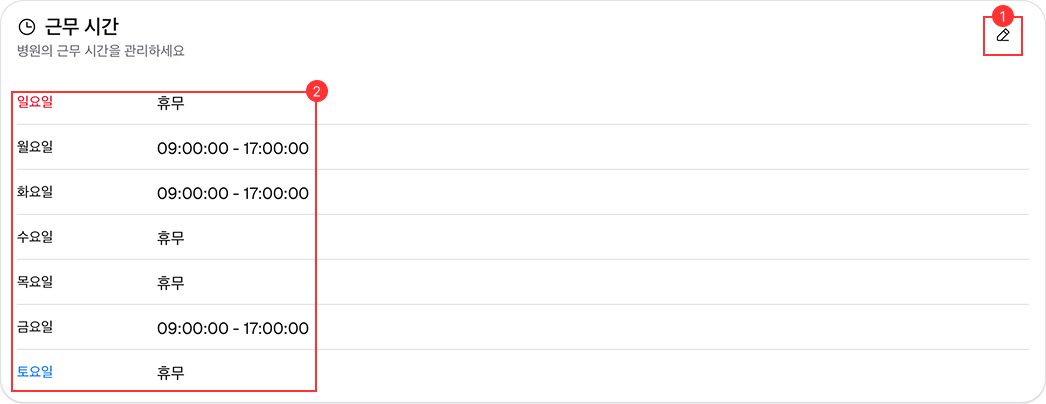
- 편집 버튼: 근무 시간 필드를 편집하려면 이 버튼을 클릭하세요.
- 근무시간 목록: 해당 근무시간이 포함된 일주일의 요일 목록입니다. 매일 특정 근무 시간을 설정하거나 "휴무"로 표시할 수 있습니다.
근무 시간 구성
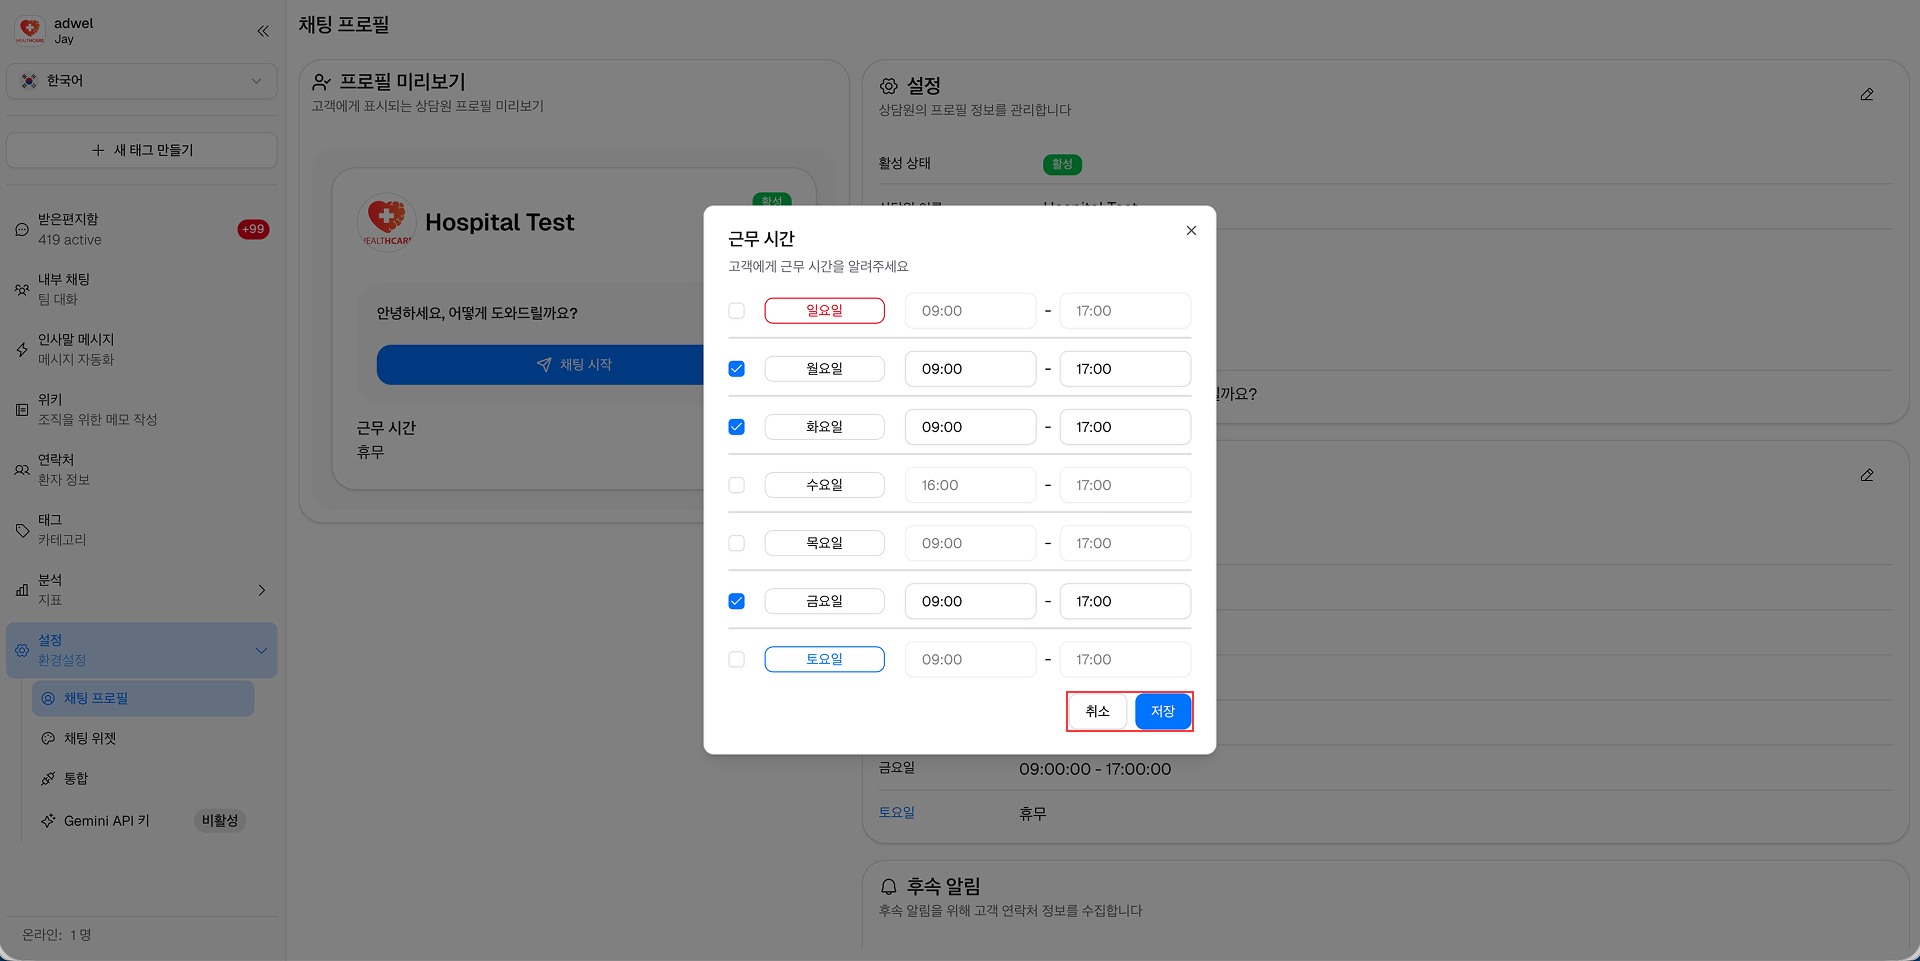
채팅 위젯의 근무 시간을 구성하려면 다음 단계를 따르세요.
1단계: 수정 버튼을 클릭하여 근무 시간 필드 수정을 활성화합니다.
2단계: 근무 시간 구성 팝업이 나타나 요일 목록을 보여줍니다. 다음 설정을 변경할 수 있습니다. (매일 적용)
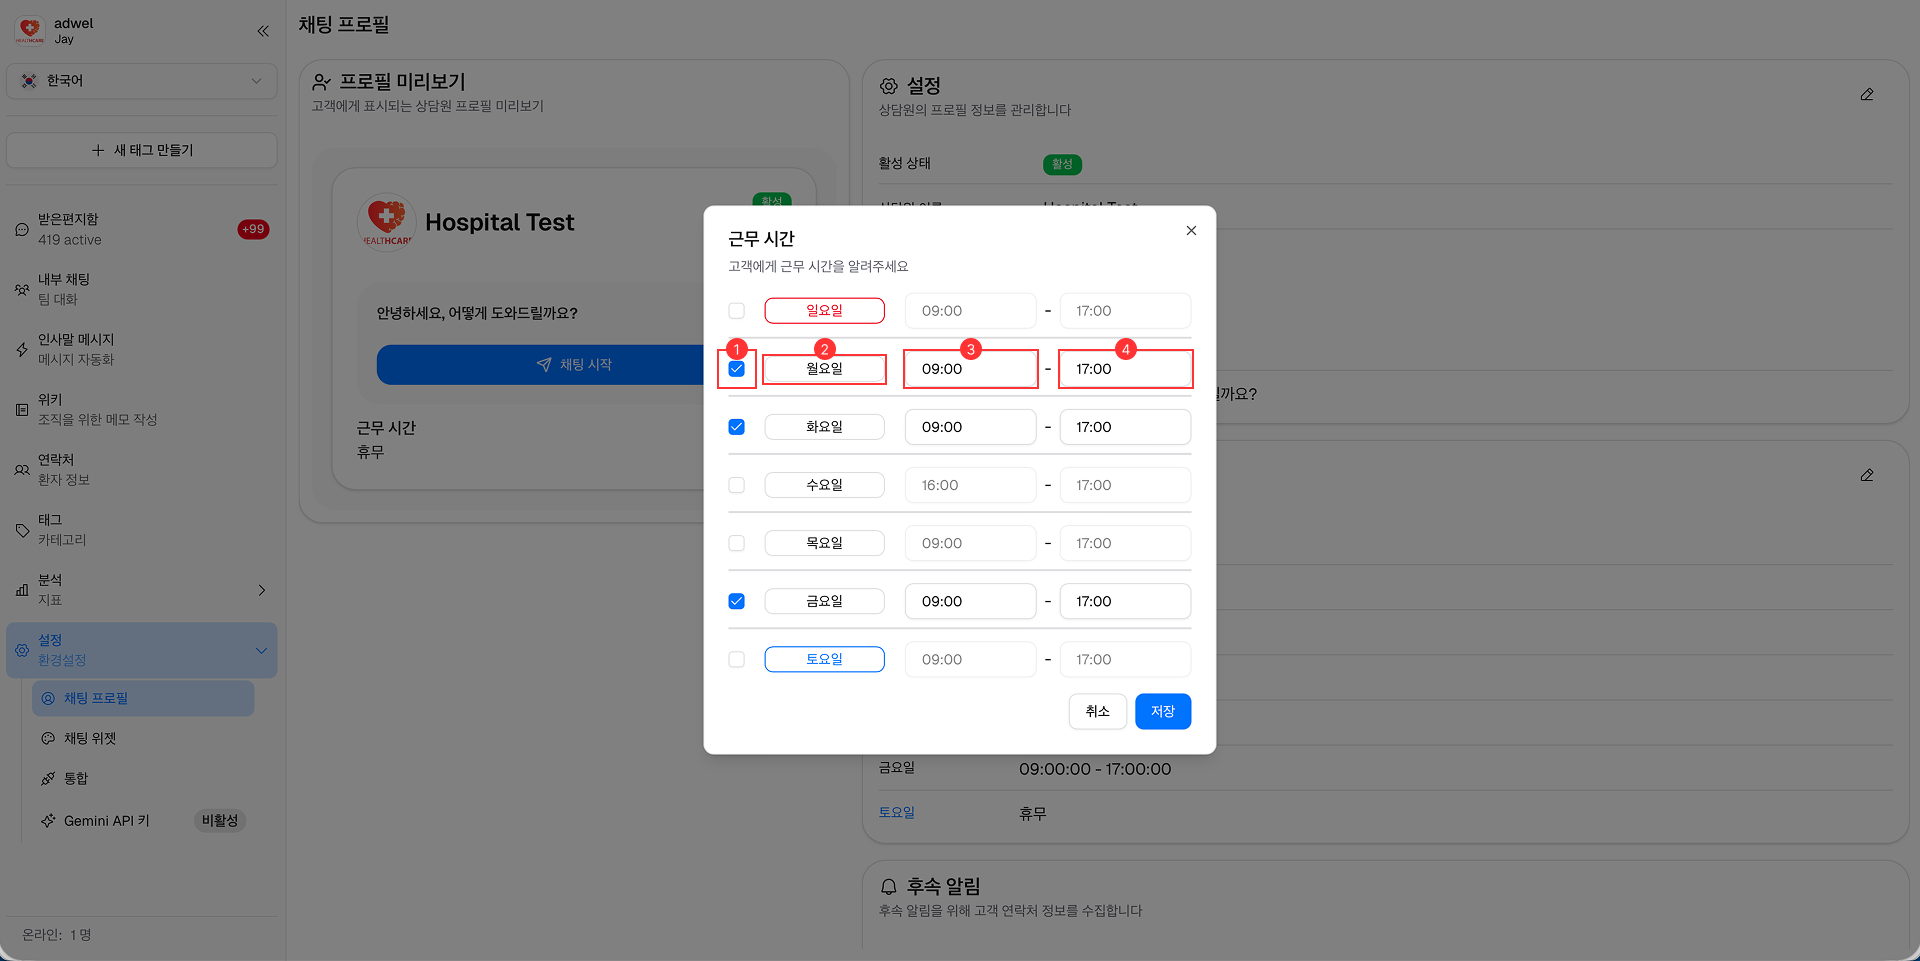
-
체크박스: 체크박스를 선택하면 해당 날짜의 근무 시간이 활성화됩니다. 해당 날짜를 "Closed"로 표시하려면 선택을 취소하세요.
-
요일 이름: 요일 이름을 표시합니다(예: 월요일, 화요일 등).
-
시작 시간: 해당 날짜의 근무 시간 시작 시간을 설정합니다.
-
종료 시간: 해당 날짜의 근무 시간이 종료되는 시간을 설정합니다.
선택 단계: 근무 시간 변경: 특정 날짜의 근무 시간을 변경하려면 시작 시간 또는 종료 시간 필드를 클릭하고 드롭다운 메뉴에서 원하는 시간을 선택하세요.
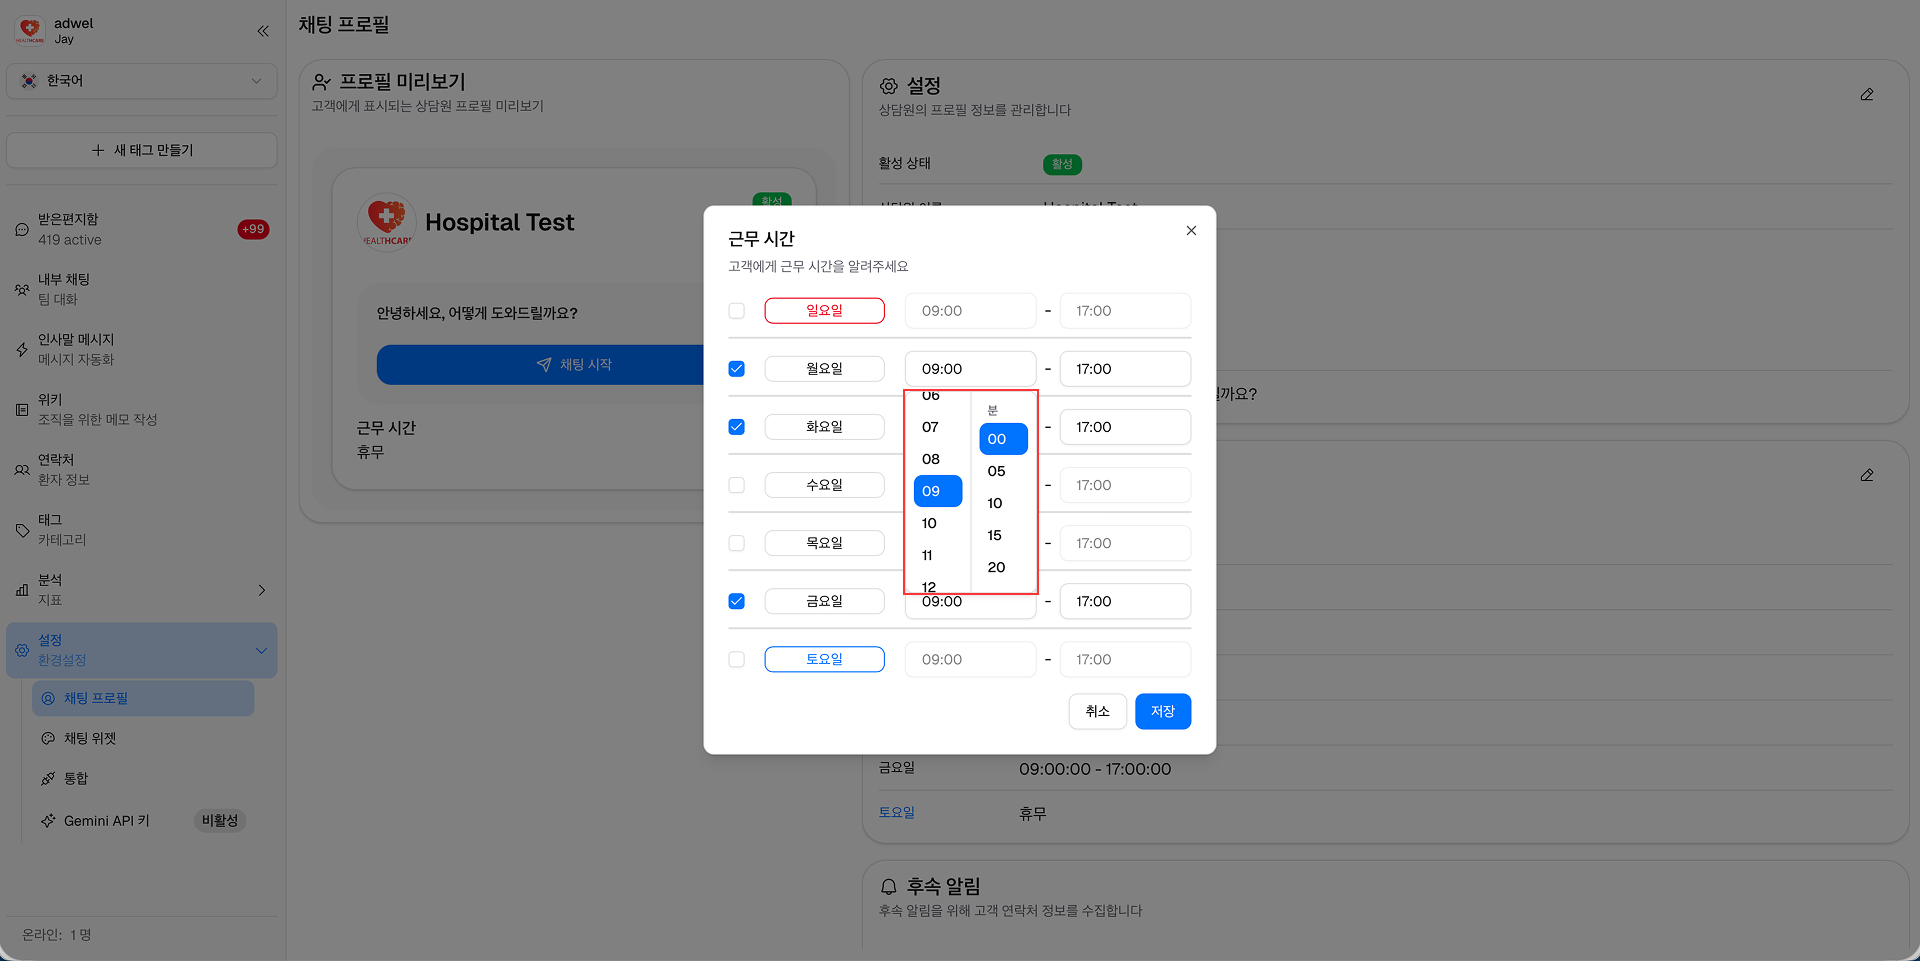
-
시간 선택: 왼쪽 열에 머물러 있습니다. 24개 단위(0~23)로 나누어집니다.
-
분 선택: 오른쪽 열에 머무르세요. 12개 단위(0, 5, 10, 15, 20, 25, 30, 35, 40, 45, 50, 55)로 구분됩니다.
** 3단계**: 매일 근무 시간을 구성한 후 저장 버튼을 클릭하여 변경 사항을 적용합니다. 변경 사항을 취소하려면 취소 버튼을 클릭하세요.